Remember that time you tried to help your parents in the garden, and ended up with more dirt on you than in the flowerbeds? That’s because using the right tools makes all the difference! This guide is all about a gardening tools lesson plan, showing you the basics to get started. We’ll explore the tools, how to use them, and even what plants love them. By the end, you’ll be ready to cultivate your own little patch of green and amaze your friends. Get ready to learn how a gardening tools lesson plan can turn you into a gardening expert!
Key Takeaways
- Learn about the essential tools for gardening and their uses.
- Discover the importance of safety when handling gardening equipment.
- Understand how to choose the right tools for different gardening tasks.
- Explore simple gardening projects you can start at home.
- Find out how to maintain and store your gardening tools properly.
Essential Tools for Budding Gardeners
Every great garden starts with the right equipment. Just like a painter needs brushes, a gardener needs tools. These tools are the foundation for any gardening tools lesson plan. Knowing what each tool does and how to use it is the first step toward becoming a successful gardener. From digging to weeding, there’s a specific tool designed to make the job easier and more efficient. With the proper tools, you can transform a plot of land into a thriving, beautiful space. Let’s explore the essential tools.
Digging Tools: The Foundation of Any Garden
Digging tools are the workhorses of any garden. They’re what you use to turn the soil, plant new flowers, and prepare the ground. Without them, you’d be stuck with your hands, and believe me, it would take forever. The type of digging tool you need depends on the size of your garden and the task you’re undertaking. Understanding the various options is essential for a complete gardening tools lesson plan.
-
Shovel: A shovel is a flat-bladed tool with a long handle, primarily used for moving soil, digging holes, and edging borders. There are different types of shovels, such as round-point shovels for digging and square-point shovels for moving materials. A shovel with a sturdy handle and a sharp blade will make your work more effective.
Shovels are designed with ergonomics in mind, making it easier to lift and move soil without hurting your back. They’re perfect for larger projects, like planting trees or preparing a new garden bed. Shovels are often made from steel or aluminum, with wooden or fiberglass handles. Regular cleaning and occasional sharpening of the blade will keep your shovel in top condition.
-
Spade: Similar to a shovel, a spade has a flat blade, but it is typically smaller and has a sharper edge. This makes it ideal for cutting through roots, edging garden beds, and transplanting plants. Spades are best for tasks requiring precision and a clean cut.
Using a spade is often easier when preparing smaller gardens or tight spaces. The sharpness of the blade allows you to easily separate roots when moving plants, ensuring minimal damage. When using a spade, it’s vital to wear sturdy shoes to avoid foot injuries. Spades are a must-have for any gardening tools lesson plan.
-
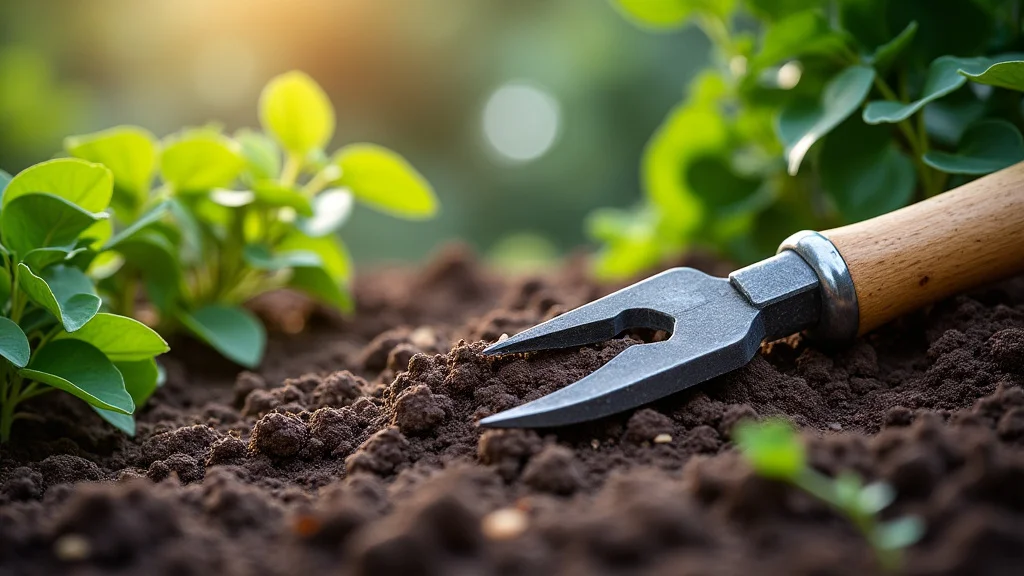
Trowel: A small, hand-held tool with a curved blade and a pointed tip, perfect for digging small holes for planting seedlings and transplanting small plants. The trowel’s size and shape give you excellent control, making it useful for delicate work.
A trowel is ideal for planting in pots, raised beds, or when working in areas where space is limited. Its pointed tip makes it perfect for digging through soil. Trowels are often made from stainless steel or plastic. After each use, clean the trowel to prevent the spread of diseases between plants.
Hand Tools: Small but Mighty
Hand tools are designed for tasks that require precision and detail. They’re smaller than the digging tools, making them perfect for working in confined spaces, like flower beds or containers. Even though these tools are small, they are essential for your gardening tools lesson plan.
-
Hand Rake: This tool features a small head with tines. It’s used for smoothing soil, removing debris, and leveling the surface of your garden beds. A hand rake is a great tool for preparing the soil for planting or creating a neat appearance.
Using a hand rake is an easy way to prepare soil for planting, ensuring that seeds have a good environment to germinate. It’s also great for gathering leaves and small twigs. Hand rakes are generally made of metal or plastic, and they’re lightweight and easy to handle.
-
Hand Fork: This is a small, three- or four-pronged tool used for loosening soil, mixing in compost, and weeding. The hand fork’s compact design makes it perfect for small spaces, while the tines are excellent at aerating the soil.
The hand fork is an excellent choice for incorporating compost or fertilizer into the soil. It also helps to break up clumps of soil, promoting better root growth. Cleaning the tines after each use will help maintain its effectiveness. A hand fork is an important part of any good gardening tools lesson plan.
-
Weeder: This tool comes in various shapes, but it’s specifically designed for removing weeds from your garden. Weeder helps pull weeds up, roots and all, ensuring they don’t grow back.
The weeder is a key tool for maintaining a clean and healthy garden. Its specialized design allows you to target weeds effectively without disturbing the surrounding plants. There are several types of weeders, including the dandelion weeder and the weeding knife. Keeping the weeds at bay is one of the most important elements of any gardening tools lesson plan.
Cutting and Pruning Tools: Shaping and Maintaining Your Garden
Cutting and pruning tools help shape your plants and keep them healthy. Just like a haircut keeps you looking your best, these tools help plants grow and thrive. They’re necessary for removing dead branches, shaping shrubs, and harvesting fruits and vegetables. Here are some of the cutting and pruning tools.
-
Pruning Shears: Pruning shears, also known as hand pruners or secateurs, are used to cut small branches and stems. The two main types are bypass and anvil shears. Bypass shears make clean cuts, perfect for pruning live plants, while anvil shears are designed for cutting dead wood.
Pruning shears are essential for keeping plants healthy, promoting growth, and removing dead or diseased branches. Proper pruning prevents the spread of diseases and encourages the plant to produce more flowers or fruits. Regularly sharpen and maintain your shears to ensure clean cuts and avoid damaging your plants.
-
Loppers: Loppers have long handles and are used for cutting thicker branches that pruning shears can’t handle. They come in bypass and anvil styles, just like pruning shears. The long handles provide extra leverage, making it easier to cut through thick branches.
Loppers are an excellent choice for pruning larger shrubs and small trees. Because the handles give you more leverage, loppers can cut branches that are over an inch thick. Always wear eye protection when using loppers to protect yourself from flying debris. Loppers are a key part of the gardening tools lesson plan for maintaining a garden’s beauty.
-
Hedge Shears: Hedge shears are designed for trimming and shaping hedges and large shrubs. They feature long blades and handles, allowing you to cut many branches at once, making the trimming process easier and faster.
Hedge shears are excellent for creating a neat, formal look for hedges and shrubs. They’re used to shape plants and ensure they maintain a consistent size and form. It’s important to keep the blades sharp and clean to make the trimming process smooth and to prevent damage to your plants.
Safety First: Guidelines for Gardening
Gardening can be a lot of fun, but it’s important to put safety first. Accidents can happen, especially when using tools. To make sure you have a safe and fun gardening experience, here are some safety guidelines to follow. It’s an important part of your gardening tools lesson plan.
Protective Gear: Your Gardening Armor
Wearing protective gear can help you avoid injuries while gardening. It acts as a shield against potential hazards and ensures that you can focus on enjoying your time in the garden. Protective gear is a must for your gardening tools lesson plan.
-
Gloves: Protect your hands from dirt, thorns, and blisters.
Gloves protect your hands from cuts, scrapes, and irritants found in the soil. There are various types of gloves, from lightweight cotton to heavy-duty leather, to meet your gardening needs. Choosing the correct pair of gloves can make a significant difference in your comfort and safety.
-
Eye Protection: Shield your eyes from flying debris.
Safety glasses or goggles are crucial when using tools like loppers, shears, or working in windy conditions. Flying soil particles, splinters, or other debris can harm your eyes. Wearing eye protection guarantees a safe gardening experience.
-
Closed-toe Shoes: Protect your feet from sharp objects and potential injuries.
Wearing sturdy shoes is important to protect your feet from potential hazards such as stepping on sharp tools, thorns, or other objects in the garden. Closed-toe shoes also provide traction and stability when working on uneven ground. Consider wearing shoes with good support to reduce strain on your feet and ankles.
Tool Safety: Handling with Care
Knowing how to use and care for your tools correctly is vital to avoid injuries. This is a very important part of your gardening tools lesson plan.
-
Inspect Tools Before Use: Always check your tools for damage.
Before using any tool, check for any damage, such as loose handles, cracks, or dull blades. If you find any damage, do not use the tool. Get it repaired or replaced to avoid injury. A pre-use inspection is the first step toward safe use.
-
Use Tools for Their Intended Purpose: Don’t try to use a tool for something it’s not made for.
Tools are designed for specific tasks. Using them incorrectly can be dangerous and could lead to injury. For example, use a spade to dig, not a shovel. This will ensure your safety and protect the tool from damage.
-
Store Tools Properly: Keep tools in a safe, dry place.
When you’re finished using your tools, always store them in a dry, safe place. This will help protect them from damage and prevent accidental injuries. A tool shed, garage, or even a designated corner in the backyard can work. Secure the tools so they can’t fall.
Working Safely in the Garden: General Precautions
Besides tool safety, there are some other things to keep in mind to have a safe gardening experience. This is an important part of your gardening tools lesson plan.
-
Be Aware of Your Surroundings: Watch out for obstacles.
Keep an eye on the area around you as you work. This means being aware of other people, pets, or objects that might get in your way. Take your time and pay attention to what’s happening around you.
-
Take Breaks: Avoid overworking yourself.
Gardening can be physically demanding, so it’s important to take breaks when you need them. This will help you avoid fatigue and reduce your risk of injury. Take a break to rest, get some water, and stretch.
-
Learn First Aid: Be ready for minor injuries.
Knowing some basic first aid is useful for treating minor injuries like cuts and scrapes. Keep a first-aid kit nearby when gardening. Learning how to deal with minor injuries helps you to stay safe and enjoy your gardening experience.
Choosing the Right Tools for the Job
Selecting the right tool for the job makes gardening easier and more enjoyable. Choosing the appropriate tool can make a significant difference in the ease and effectiveness of your gardening. This is an important part of your gardening tools lesson plan.
Matching Tools to Tasks: The Right Tool for the Right Job
Different tasks require different tools. Selecting the right tools helps you work more efficiently and avoid damaging your plants. Using the correct tools guarantees that each gardening task is executed correctly.
-
For Digging: Choose a shovel or spade.
Shovels and spades are ideal for digging holes, moving soil, and planting trees. For smaller jobs or precision work, a trowel is more appropriate.
-
For Weeding: Use a weeder or hand fork.
Weeders are designed to remove weeds easily and quickly. A hand fork is a good choice for weeding around established plants or aerating the soil.
-
For Pruning: Select pruning shears or loppers.
Pruning shears are useful for cutting small branches and stems. Loppers are more suitable for thicker branches, providing the leverage required to make clean cuts.
Considering Your Garden’s Size and Type
The size and type of your garden will influence the tools you need. A small balcony garden will have different needs than a large vegetable patch. Considering your garden’s size and type guarantees that you have the tools needed for the job.
-
Small Gardens or Containers: Choose hand tools.
Hand tools such as trowels, hand rakes, and hand forks are well suited for working in confined spaces. These tools offer precision and control and are ideal for container gardening.
-
Large Gardens: Have larger tools on hand.
Larger gardens may benefit from shovels, spades, and hedge shears to handle more extensive tasks. The additional space allows the efficient use of bigger tools.
-
Type of Plants: Consider the plants you grow.
If you’re growing roses, you’ll need pruning shears or loppers to cut them. For vegetables, a trowel and hand fork are ideal. Consider the particular requirements of your plants when choosing your tools.
Budget and Quality: Investing Wisely
While it’s important to get the right tools, remember that quality and budget both matter. Spending some time and money on a good selection of quality tools can make all the difference. This is a very important part of your gardening tools lesson plan.
-
Consider the Quality: Pick tools that will last.
Invest in quality tools made from durable materials that will last for many years. It’s often better to spend a little more on a well-made tool than to frequently replace a cheap one.
-
Set a Budget: Determine how much you will spend.
Determine your budget before you go shopping. There are tools for every budget, and you do not need to purchase every tool at once. Start with the basics and expand as your needs grow.
-
Read Reviews: See what other people say.
Before you purchase tools, read online reviews or ask for suggestions from friends. This will help you choose tools that are well-made and suited to your needs.
Gardening Projects to Get You Started
Once you have your tools, it’s time to put them to use! Starting with a small project is a great way to learn. Here are some simple gardening projects to get you started on your gardening journey. Gardening is a fantastic hobby. Let’s make this gardening tools lesson plan useful.
Starting a Small Herb Garden
Growing herbs is a rewarding project, especially if you enjoy cooking. You can grow herbs in containers or directly in the ground. This provides a constant supply of fresh, flavorful herbs that will elevate your meals. A small herb garden is an excellent way to start your gardening adventure.
- Choose Your Herbs: Select herbs you use frequently (basil, mint, chives).
- Select a Sunny Spot: Most herbs need at least 6 hours of sun each day.
- Prepare the Soil: Use a trowel to loosen the soil and add some compost.
- Plant the Herbs: Follow the planting instructions on the seed packets or plant labels.
- Water and Maintain: Water regularly and prune the herbs as needed to encourage growth.
Creating a Simple Flower Bed
Planting a flower bed adds beauty to your yard. You can select flowers based on your favorite colors, and you can change your garden as your tastes evolve. A flower bed also provides a good opportunity to learn about different types of flowers, planting techniques, and how to maintain them. This gardening tools lesson plan will tell you more.
- Choose a Location: Select a location that gets enough sunlight.
- Remove the Grass: Use a shovel or spade to remove the grass.
- Prepare the Soil: Loosen the soil with a shovel and mix in compost or fertilizer.
- Plant Your Flowers: Follow the planting instructions on the seed packets or plant labels.
- Water and Mulch: Water the flowers regularly and add mulch to help retain moisture.
Starting a Vegetable Garden
Growing your own vegetables is incredibly rewarding, providing fresh produce directly from your garden to your table. You will learn about the process of food production and the satisfaction of harvesting the fruits of your labor. Your gardening tools lesson plan is all about that.
- Choose Your Vegetables: Pick vegetables you like to eat (tomatoes, lettuce, peppers).
- Select a Sunny Spot: Vegetables need at least 6 hours of sun each day.
- Prepare the Soil: Loosen the soil with a shovel and add compost or fertilizer.
- Plant Your Vegetables: Follow planting instructions for the vegetables you picked.
- Water and Weed: Water regularly and weed frequently to keep your garden healthy.
Maintaining and Storing Your Tools
Taking good care of your gardening tools will prolong their life. Just like you clean your bike, your tools need some care too. You’ll ensure they’re always ready when you need them and help you avoid unnecessary spending on replacements. These tips are important in your gardening tools lesson plan.
Cleaning Your Tools: Keeping Them in Top Shape
After each use, cleaning your tools is very important. Cleaning ensures that your tools last longer and perform better. Regular cleaning removes dirt, sap, and other debris that could damage the tools over time.
-
Remove Dirt and Debris: Clean off dirt with water and a scrub brush.
After each use, remove dirt and debris from your tools. This can be done with a scrub brush and water. If you want to get rid of tougher dirt, use a tool such as a wire brush or scraper.
-
Sharpen Blades: Keep cutting edges sharp.
Sharpening the blades of your tools ensures clean, efficient cuts. It also reduces the effort required to use the tools. Use a file or sharpening stone to keep your blades in good shape.
-
Lubricate Moving Parts: Prevent rust and ensure smooth operation.
Lubricate moving parts, such as the hinges on pruning shears. This reduces friction and prevents rust, prolonging the life of your tools. A lightweight oil, like a machine oil, is often best.
Proper Storage: Protecting Your Investment
The right storage can protect your tools from the weather and other damage. By properly storing your tools, you are also protecting yourself and others from injury. Properly storing your tools is an essential part of your gardening tools lesson plan.
-
Store in a Dry Place: Protect tools from moisture.
Store your tools in a dry place to prevent rust and corrosion. A garage, shed, or covered outdoor storage area can work well. If you have to store your tools outdoors, consider using a tool shed or waterproof container.
-
Hang Tools Up: Keep tools off the ground to organize your space.
Hang your tools on hooks or racks when possible. This keeps them off the ground and protects them from damage. It also makes it easier to find and access your tools.
-
Protect Blades: Cover sharp edges.
Cover the sharp edges of your cutting tools to protect them and prevent accidental injuries. Blade covers are available, or you can improvise with cardboard or other protective materials.
Frequently Asked Questions
Question: What’s the best tool for digging holes?
Answer: A trowel is ideal for small holes, while a shovel is better for larger holes.
Question: How often should I sharpen my pruning shears?
Answer: Sharpen your pruning shears at least once a year, or more often if you use them frequently.
Question: What’s the best way to store my gardening tools?
Answer: Store your tools in a dry place and hang them up to protect them from the weather and damage.
Question: How can I protect my hands while gardening?
Answer: Wear gloves to protect your hands from dirt, thorns, and blisters.
Question: What should I do if I cut myself while gardening?
Answer: Clean the cut with soap and water and apply a bandage. If the cut is deep or doesn’t stop bleeding, get medical attention.
Final Thoughts
You’ve explored the basics of gardening tools lesson plan, from the tools you need to the safety guidelines to follow. You now know about digging, hand tools, cutting, and pruning tools, and you have some gardening projects to get you started. Remember, gardening is a skill that improves with experience. So, don’t be afraid to try new things and make mistakes. Every seed you plant, and every weed you pull, will bring you closer to becoming a skilled gardener. Use what you’ve learned here, get out there, and start growing! Your journey into the world of gardening is just beginning. Happy gardening!